ELK + Netflow

This guide assumes you’ve got a running ELK stack, and is tailored for a docker installation based on docker-elk. See my ELK on docker guide here

Also, the Netflow source configuration specifcs are for a Ubiquity EdgeRouter – you’ll need to get the specifics for your device if different.

Ubiquity EdgeRouter Config

configure
set system flow-accounting interface eth0
set system flow-accounting netflow version 9
set system flow-accounting netflow server <ip> port 2055
set system flow-accounting netflow enable-egress
commit
save

Logstash configure

cd ~/docker-elk

Open ./logstash/pipeline/logstash.conf in your editor

input {                                                                                                                                                                                                                                                                                               
  udp {                                                                                                                                               
    port => 2055                                                                                                                                      
    codec => netflow {                                                                                                                                
      versions => [5, 9]                                                                                                                              
    }                                                                                                                                                 
    type => netflow                                                                                                                                   
  }                                                                                                                                                   
}                                                                                                                                                                                                                                                                                                   

output {                                                                                                                                              

  }                                                                                                                                                   
  if [type] == "netflow" {                                                                                                                            
      elasticsearch {                                                                                                                                 
        index => "logstash_nf-%{+YYYY.MM.dd}"                                                                                                         
        hosts => "elasticsearch:9200"                                                                                                                 
      }                                                                                                                                               
    } else {                                                                                                                                          
        elasticsearch {                                                                                                                               
                hosts => "elasticsearch:9200"                                                                                                         
        }                                                                                                                                             
    }                                                                                                                                                 
}

Open docker-compose.yml in your editor, and add the following to the logstash service to ensure the NetFlow port 2055 is routed to the logstash container

  ports:                                                                                                                            
      - "2055:2055/udp"

Restart ELK

sudo docker-compose up -d

sudo docker-compose restart

Kibana configuration

  • Browse to Kibana
  • Goto Management, Index Pattern, and create a few pattern based on
    `logstash-nf* and select netflow.last_switched

Test

If it’s working you should see the flows in the Kibana discover tab (make sure to select logstash-nf*)

Now you can go ahead an do some data mining, visualizations and dashboards

Some filter and visualization ideas

Purpose: See what outsiders (bots/worms etc) are attempting to
connection in via your WAN interface on low ports < 1024

Chart Style: Pie
Search: netflow.l4_dst_port:<1024 AND netflow.direction:0
Buckets: Split by netflow.l4_dst_port
Add Sub-Bucket: Split by netflow.ipv4_src_addr.keyword

Purpose: Look at 23/TCP Telnet based Botnet activity over time

Chart Style: Area
Search: netflow.l4_dst_port:23 AND netflow.direction:0
Y-Axis: Count
X-Axis: Date Histogram with netflow.last_switched

Purpose: Look into what a specific LAN side IoT device is connecting too

Chart Style: Pie
Search: netflow.ipv4_src_addr:<device ip> AND netflow.direction:1
Buckets: Split by netflow.l4_dst_port
Add Sub-Bucket: Split by netflow.ipv4_src_addr.keyword

What’s next?

I’ll look to enrich the NetFlow data with:

Sources

PowerShell: remotely verify if TCP port is listening

I recall one of the most powerful lessons I learnt on the job was when I learnt how to remotely (or locally – 127.0.0.1) verify if a TCP port was actively listening using the TELNET command. So many ‘Is the firewall open?’ questions answered with a single command

More recently I’ve been in situations where I have a company assigned Windows notebook, with telnet.exe missing and various GPO restrictions in place. However, these notebooks did have PowerShell – so I became curious to determine if I could achieve the same verification as I was with Telnet – Yes you can. Open PowerShell – and use this:
If (New-Object System.Net.Sockets.TCPClient -ArgumentList '<fqdn.domain.tld>',<port-num>) { Write-Host 'YES' } If ($? -eq $false) { Write-Host 'NO' }

Replace <fqdn.domain.tld> with the Fully Qualified Domain name or IP address of the host to target.

Replace <port-num> with the target TCP port to probe if listening.

The script will respond with ‘YES’ if it’s listening, and ‘NO’ if it’s not.

Windows 10 – Reveal saved WiFi password as unprivileged user

Home/Sufficiently privileged users can typically get the WiFi password of an Access Point that they are currently connected to by doing the following:

  1. Connect to the WiFi AP you want to un-mask the password for
  2. Right-click the WiFi symbol in the systray and select ‘Open Network and Sharing Center’
  3. Click ‘Change adapter settings’
  4. Right click the WiFi adapter
  5. In the WiFi Status dialog, click ‘Wireless Properties’
  6. Click the Security tab and then check ‘Show Characters’ – this should show your current Wifi password

However, there are cases where this option isn’t viable – either the machine is locked down and doesn’t let you select ‘Show Characters’ – or you are in a situation where you are not in range of the WiFi AP to actually connect. Try this via the Windows command prompt (cmd.exe):

Run this command to list the wifi profiles the machine knows about:

netsh wlan show profiles

Then show the password for a specific profile:

netsh wlan show profiles name=<profile> key=clear

Replace <profile> with your profile name / SSID.

The password should be shown in Key Content: field

Selective VPN routing [Solution: DSVR]

Before sharing about what I believe is my best solution yet, i’ll take a walk down memory lane…

Client VPN

Got my first VPN account (PPTP/L2TP) and happily used it from my various Windows/Mac/iOS clients. Very quickly I came across a few limitations, namely:

1) Only one device at a time could use the VPN.
2) More restricted clients did not have a client side capability to configure the VPN (like the Apple TV/PS3)
3) When a device was on the VPN, all traffic went down it – not ideal from a performance perspective, and when you’re location is determine by IP (e.g. Google Maps).
4) Minor at the time, but could not have multiple VPNs running.

Router VPN [+Source Based Routing]

Configuring  VPN connection at a single aggregation point (i.e. the router) was the next step, as this did solve some of the limitations (1 & 2 above). After a bunch of research (read: trial/error) I concluded that there was no practical way to be selective at the router based on destination as many services used over the VPN where using CDNs with massive network ranges which we’re not practically predictable.

I decided that source based routing was a good solution, in my case I selected my Apple TV to be the only source to push down the VPN this has served me well,  and I published a tutorial on it a while back.

Defining the next step

Even though my problem/use-case had largely been solved, I wanted to go further. I set myself the following goals for my next solution:

1) Selective destination routing, route only sites/domains I want.
2) Multiple concurrent VPN client support, each with their own destination mappings.
3) Multiple clients able to share the outgoing VPN(s) connection(s)
4) A ‘plug-n-play’ appliance, with no configuration changes to exiting infrastructure (clients/router/modem)
5) Simple web administration interface.

With those goals in mind – it was time to determine a solution.

New Solution: DSVR [Domain-Specific VPN Router]

dsvr-logical-v0.2

1. Selective destination routing

I’ve already touched on some of the challenges (e.g CDNs) – there were a few more – but ultimately I determined that a pre-populated list of IP routes for a service will not work.

Then an idea came to me – what if I made something that I’d best describe as a ‘DNS Router’, at a high-level it would need to do the following:

1) Intercept all outgoing DNS queries from my clients.
2) Analysis the query name against which domains I’m interested in pushing down the VPN.
3) Pass the unmodified DNS request upstream to a valid DNS server, and get a valid response back.
4) Before passing the DNS response to the original client, add routes for the RR data within the DNS record

What does this do? For each matched DNS request we are creating static routes down the VPN!

Theory is great – but I needed to now make this thing.

It was clear to me that the best starting point was to leverage existing work that’s been done creating a DNS proxy. I found a great one – dnschef – by Peter Kacherginsky. Using this as a strong foundation I was able to modify and expand this to perform the 4 points above, and also handle some edge cases around CNAME responses etc.

In my testing – this has proven to work and be stable.

2. ‘Plug-n-play’ appliance, no configuration changes, clients able to share

Deciding on a hardware platform for the appliance was easy – Raspberry Pi – it’s low-cost, low-power, runs linux and small. It’s not without it’s limitations though (e.g. NIC limited by USB bus)

The aggregation point I selected to place the Raspberry Pi was between the existing CE/Modem and home router. This meant the RPi had to be configured as a typical NAT router. Other than the OS level configuration required to create the router, the RPi only has a single NIC, so I added a second NIC interface using a USB add-on.

To achieve the second portion of this goal ‘no configuration changes to exiting infrastructure’, I used iptables to transparent redirect all outbound DNS queries to my new custom DNS proxy/router.

dsvr-physical-v0.2

3. Concurrent VPN client support

This was wasn’t too tough (for PPTP), basically just needed to configure the following for each:

1) PPP peer file
2) IP-UP script
3) INIT.D script

OpenVPN support is in the pipeline.

4. Web administration

Seeing that the core capability was done in Python, it was a logical choice to create the web interface in the same. I selected the Flask web-framework, and I used there small dev web server in lieu of the big boys like Apache.

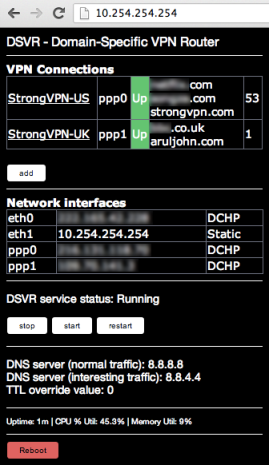
The web interface allows for the following functions:

1) PPTP VPNs – Add/Modify/Delete
2) Specify which wildcard domains should route down which VPN
3) Stop/Start/Restart the core DSVR service
4) Status display for PPTP tunnel status, IP assignments, Route counts, uptime, mem/cpu usage
5) Reboot the RPi

webadmin (1)

Get/Build it

This blog post is just a static introduction. The code, instructions, limitations, issues and TODO’s are being maintained on the DSVR github page.

Do note that this should be considered an ALPHA release – it has not been tested by many people – use at your own risk.

gitHub-download-button

TP-Link wr1043nd + DD-WRT build 14896 = Memory Leak [Solved]

There appears to be a pretty nasty memory bug when using DD-WRT build 14896 on a TP-Link WR1043ND router. From the Cacti graphs below it clearly shows a sudden drop off in available memory, then after a reboot things get cleared up again.

Seems others have had similar issues.

I intend to try the BrainSlayer r20675 release to see if that resolves the issue – and will report back.

graph_image.php

graph_image.php2


[Update 14-Mar-2013]
Confirmed the BrainSlayer r20675 release firmware did the trick! Here are some new graphs showing no downtime with no complete memory drop-outs over 2 days with very high numbers of connected clients:
graph_image.php1graph_image.php2graph_image.php3

Apple TV 2 – Rename RemoteHD AirPlay name

If you haven’t already you can activate AirPlay on your old Apple TV 2 – just look here http://www.remotehd.com/AppleTV/Overview

Anyways – one thing I did find annoying that the AirPlay name is “Apple TV-RHD”, and I wanted to be able to customize it to something more appropriate, like “Bedroom” or “Patio”. I have not solved the problem completely yet as even though I can set a custom name, it still suffixes it with “-RHD”.

1. SSH to your AppleTV (usually appletv.local), I use CyberDuck on Mac to be able to copy/replace files via a GUI.

2. Download the file /etc/rc.common to your Mac/PC

3. Add the following line to the bottom of the file replacing ‘Bedroom’ with whatever you want it to be:

sudo -u frontrow defaults write com.apple.frontrow "UserDeviceName" 'Bedroom'

4. Copy the file back to your Apple TV, and be sure to set the permissions to allow execution of the script

chmod +x /etc/rc.common

5. Reboot your AppleTV and enjoy your (almost) custom AirPlay name.

I’ll work on getting rid of the “-RHD” but looks like it may need to be some hex editing fun :/

StrongVPN PPTP on DD-WRT – Source based routing (improved)

Update: Suggest you consider a new solution, that I’ve posted here

Hi there –

Myself and others have had a problem using the solution that I posted here. It works for a couple of hours, but then stops and requires a reboot to get it running again. I finally took some time to try and figure it out, and found that I needed to modify the IP-UP script to reestablish a couple of things. Here is an update to the original post:

I’m a StrongVPN customer and just today I had a use case that required that I was able to setup the VPN tunnel from my router and only route a specific host down the VPN.

Here is how I did it using these:

Do the following on your router:

Services->VPN

  • PPTP Client Options: Enable
  • Server IP or DNS name: <this is the IP of the VPN server, hostnames DON’T work>
  • Remote Subnet: <This is the IP that the YOU receive from the VPN server, to get this first connect on Mac/Win and check what IP you get)
  • Remote Subnet Mask: <This is the Subnet Mask of the remote VPN server, to get this first connect on Mac/Win and check what subnet you get – likely that 255.255.255.0 would be fine>
  • MPPE Encryption: mppe required,stateless
  • MTU: 1450
  • MRU: 1450
  • NAT: Enable
  • Username: <This is your StrongVPN user ID>
  • Password: <This is your StrongVPN password>

Setup -> Basic Setup

Under: Network Address Server Settings (DHCP)

  • Static DNS 1: 216.131.94.5
  • Static DNS 2: 216.131.95.20

Administration -> Commands

  • EDIT the INT and SOURCETOROUTE and interface (e.g ppp0) to suit and paste the following to the end of the STARTUP script, then click ‘save startup’. The IP specified in SOURCETOROUTE is the source IP that will be routed via the VPN.
    # Customize PPTPD client
    sleep 50
    mkdir /tmp/etc/config
    echo "#!/bin/sh" > /tmp/pptpd_client/ip-up;
    echo "SOURCETOROUTE=192.168.1.119" >> /tmp/pptpd_client/ip-up;
    echo "REMOTEIP=\$(ifconfig ppp0 | sed -n 's/.*inet *addr:\([0-9\.]*\).*/\1/p')" >> /tmp/pptpd_client/ip-up;
    #echo "ip rule add from \$SOURCETOROUTE table 200" >> /tmp/pptpd_client/ip-up;
    echo "/usr/sbin/ip route add default via \$REMOTEIP dev ppp0 table 200" >> /tmp/pptpd_client/ip-up;
    echo "/usr/sbin/ip route flush cache" >> /tmp/pptpd_client/ip-up;
    echo "touch /tmp/execute-debug" >> /tmp/pptpd_client/ip-up;
    echo "/usr/sbin/iptables --table nat --append POSTROUTING --out-interface ppp0 --jump MASQUERADE" >> /tmp/pptpd_client/ip-up;
    echo "/usr/sbin/iptables --insert FORWARD --protocol tcp --tcp-flags SYN,RST SYN --jump TCPMSS --clamp-mss-to-pmtu" >> /tmp/pptpd_client/ip-up;
    #echo "echo "/tmp/pptpd_client/ip-up - $(date)" >> /tmp/dbvpndebug" >> /tmp/pptpd_client/ip-up;
    chmod 777 /tmp/pptpd_client/ip-up;
    
  • Then in the same area, add the following to the FIREWALL script, and once again modify the SOURCETOROUTE and interface as necessary:
    INT=ppp0
    SOURCETOROUTE=192.168.1.119
    echo “sleep 40″ > /tmp/firewall_script.sh
    echo “/usr/sbin/iptables –table nat –append POSTROUTING –out-interface $INT –jump MASQUERADE” >> /tmp/firewall_script.sh ;
    echo “/usr/sbin/iptables –insert FORWARD –protocol tcp –tcp-flags SYN,RST SYN –jump TCPMSS –clamp-mss-to-pmtu” >> /tmp/firewall_script.sh ;
    echo “ip rule add from $SOURCETOROUTE table 200″ >> /tmp/firewall_script.sh ;
    echo “REMOTEIP=\$(ifconfig ppp0 | sed -n ‘s/.*inet *addr:\([0-9\.]*\).*/\1/p’)” >> /tmp/firewall_script.sh ;
    echo “/usr/sbin/ip route add default via \$REMOTEIP dev ppp0 table 200″ >> /tmp/firewall_script.sh ;
    #echo “echo “/tmp/firewall_script.sh – $(date)” >> /tmp/dbvpndebug” >> /tmp/firewall_script.sh ;
    sh /tmp/firewall_script.sh &
    

    Enjoy.

StrongVPN PPTP on DD-WRT – Source based routing

Update: Improved version posted here

I’m a StrongVPN customer and just today I had a use case that required that I was able to setup the VPN tunnel from my router and only route a specific host down the VPN.

Here is how I did it using these:

Do the following on your router:

Services->VPN

  • PPTP Client Options: Enable
  • Server IP or DNS name: <this is the IP of the VPN server, hostnames DON’T work>
  • Remote Subnet: <This is the IP that the YOU receive from the VPN server, to get this first connect on Mac/Win and check what IP you get)
  • Remote Subnet Mask: 255.255.255.0
  • MPPE Encryption: mppe required,stateless
  • MTU: 1450
  • MRU: 1450
  • NAT: Enable
  • Username: <This is your StrongVPN user ID>
  • Password: <This is your StrongVPN password>

Setup -> Basic Setup

Under: Network Address Server Settings (DHCP)

  • Static DNS 1: 216.131.94.5
  • Static DNS 2: 216.131.95.20

Security -> Firewall

  • SPI Firewall: Disable

Administration -> Commands

  • EDIT the INT and SOURCETOROUTE variables to suite and paste the following, then click ‘save firewall’. The IP specified in SOURCETOROUTE is the source IP that will be routed via the VPN.
    INT=ppp0
    SOURCETOROUTE=192.168.1.119
    echo "sleep 40" &gt; /tmp/firewall_script.sh
    echo "/usr/sbin/iptables --table nat --append POSTROUTING --out-interface $INT --jump MASQUERADE" &gt;&gt;  /tmp/firewall_script.sh ;
    echo "/usr/sbin/iptables --insert FORWARD --protocol tcp --tcp-flags SYN,RST SYN --jump TCPMSS --clamp-mss-to-pmtu" &gt;&gt; /tmp/firewall_script.sh ;
    echo "ip rule add from $SOURCETOROUTE table 200" &gt;&gt; /tmp/firewall_script.sh ;
    echo "REMOTEIP=\$(ifconfig $INT | sed -n 's/.*inet *addr:\([0-9\.]*\).*/\1/p')"  &gt;&gt; /tmp/firewall_script.sh ;
    echo "ip route add default via \$REMOTEIP dev $INT table 200"  &gt;&gt; /tmp/firewall_script.sh ;
    echo "ip route flush cache" &gt;&gt;  /tmp/firewall_script.sh ;
    sh /tmp/firewall_script.sh &amp;
    
  • Reboot your router, after which give it about 5mins and give it a try from the machine specified in SOURCETOROUTE

Wireshark on Mac OS X (Snow Leopard)

Get binary: http://www.wireshark.org/download.html (I got 1.4.2)

  • Install .DMG
  • Copy the ‘Utilities’ folder from the DMG to /usr/local/bin
  • Copy the entire ‘ChmodBPF’ folder to /Library/StartupItems/
  • sudo xattr -r -d com.apple.quarantine /Library/StartupItems/ChmodBPF
  • sudo chown -R root:wheel /Library/StartupItems/ChmodBPF
  • Restart your machine, then it should work.